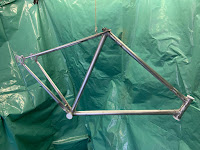
They say all the work is in the preparation, and they're not wrong, while last week I managed to sand the paint off the tubes with an electrical sander, this weekend I was left with the task of hand sanding all the joints. Being a vintage frame, all the joints are not butt welded like a modern frame, they have intricate lugs that hold the tubes which are then brazed into place.
Anyhow, 4 hours or sanding got me to the point where I could spray the first coat of primer...
On Sunday I wet sanded the primer very lightly to ensure it was smooth and applied a second coat. While that was drying, I got to work on the brake callipers. The ones that came with the bike will work with more standard 700c road rims, so these just needed some cleaning up. You can see how a bit of elbow grease and Autosol did the trick with a before and after shot...
I have a load of odds and ends on delivery, handle bar tape, brake cable inner and outers and brake cable cutters. Still to source the wheels and a saddle. So far the project has cost £159, but it's been great fun...


Comments
Post a Comment